September 7, 2011

Busy Bag Swap: Day 8 (Silly Faces)


Angela is one of Charlie's friends from growing up...all the way back to Kindergarten! I met her a couple years ago at Charlie's 10 year High School Reunion and have kept up with her via her blog since!   I was delighted when she drove from out of town to attend our Busy Bag Swap so that I could see her cute pregnant self! (Charlie was glad to be able to catch up with her for a little bit after the Swap, too!) Her little girls (one still in her tiny belly) have such beautiful, classic names!


Family: I have a 2 1/2 year old girl and another precious baby girl on the way

How do you spend your free time? Mostly with my family, there is nothing I would rather do. My hobbies are scrapbooking and photography. I have a whole craft room, it is amazing! Let me tell you that a certain little
girl loves it too. She can destroy it in under 2 minutes.

When you were a child, what was one of your favorite ways to spend your day? Playing for sure. I had the best friends that lived on my street. We would swim, ride go-carts, jumped on trampolines, and there was once even a turtle farm! Great times for sure!

Fondest memory with your mom as a child? All memories with my mom are so sweet. She always worked to make sure everyday was special. I hope one day my girls say the same!

What does special time with your children look like? Cooking, playing make-up, reading, crafts/painting. I am a firm believer in spending quality time with my girl doing the things she loves to do.

Favorite outdoor activity with your kids? Swimming for sure. My girl has inherited my love of the water.

A favorite tradition that you want to pass down with your children? All things Jesus! All things holidays, I love to celebrate each special season! I hope to one day have a tradition of family game night when my girls get older.


************************

This silly face-craft project encourages toddlers to develop fine motor skills, creative skills and their attention spans in a fun and rewarding way. The outcome will be adorable silly faces that provide hours of fun!


Each bag contains a mint tin full of silly face parts, 4 make a face templates, and 4 sorting cards.


To start with, each toddler can begin to build silly faces using the lid of the mint tin. This will allow parents to have a conservation with their kiddos about facial features and discuss the way in which faces differ from one another.


If your child can differentiate between facial parts this is where the sorting cards can be used. Encourage kiddos to sort eyes, nose, mouths, etc using the cards.


Finally, this project can be used to teach your toddlers about emotion by building different faces. The 4 emotions that were included in the bag were happy, sad, excited, and mad.


Ready to make your own silly faces? For 26 bags I used:

-1 downloadable sheet of silly faces
-26 mint tins ($0.70 per tin, this was the most expressive part at $18)
-1 roll of magnets ($3.00 at Wal-mart)
-Cardstock for sorting cards and face templates (50% off at Hobby Lobby total cost around $10)
-I used address labels to print which face for the kiddos to make
- I used my own printer to print faces and labels, and cards

Total cost for making 26 bags was around $30 dollars, not including ink.

Here is how I made the bags:

-Print, cut, and apply magnets to all your silly faces. This is the most time consuming part. Yikes! I had to enlist the help of hubs and co-workers to help with this.
-Put the silly face parts in each mint tin. I cut left over pattern paper to adhere to the front of the mint tin to dress it up a bit.
-Print and cut sorting cards. I printed the 4 sorting cards on one sheet of cardstock and then cut them down to the size of 5x5 using my paper trimmer.
-Cut face templates.
-Print address labels and apply to the face template on which face you would like to build. The options are almost limitless here.

Now it is time to make any day fun building silly faces!


Download:
Silly Faces Printable (I'm not sure what site this is from, but if Angela can recall, we'll post it!)


**Terms of Use:
We'd love for you to feel free to use the files that the ladies in our Busy Bag Swap have worked hard to create, but please keep in mind that the printable images and files on this site are some of our ladies own exclusive designs. They have been generous enough to freely share them.

The terms of use for using the free printable crafts and activities are as follows:  You may share these printables with students, friends, neighbors and family or even with your child's class full of children. As long as you share for personal use only. Please do not post printables on a web site - instead provide a link back to the original posting on this site. Linking to the original page is both welcome and appreciated.


**********************
                                       Go check out what Busy Bag is up today on Grow!

September 6, 2011

Busy Bag Swap: Day 7 (Geoboards)


Remember Lynsey? She is the amazingly talented photographer-turned farmer's wife that gave me most ALL of the pics to use in my Bottletop Barnyard Busy Bags.  Most of these animals (well, all of the ones of the pics that she took) are from their farm.  We've been dear friends for 8 years...prior to marriage and children (for me)...all the way back to when I was a college student.  She saved the day for us when she took our engagement pictures, after a bad experience with our wedding photographer.  And not just saved the day, but took some of my favorite pictures that we own.  Want evidence? She took this with a FILM camera...this image is scanned in (and downloaded from FB so it's not the best  quality) but, have a look for yourself...this was completely candid. I love how she captures moments so naturally.


You'd think I would have learned my lesson then and fired my hired photographer...who we paid quite a hefty fee.  But, nope...we kept him and Charlie and I did not get ONE GOOD PICTURE of the TWO OF US on our WEDDING DAY! So, Lyns saved the day again.  (These next two were also downloaded from FB.  Too lazy to find the disc these are on. Sorry.)


Our wedding did seem like a fairy tale, but...no, we did not have a white horse at our wedding. About 7 months after we were married, a horse drawn carriage business contacted Lyns about a swap.  They wanted pictures of a bride and groom with their horse, in exchange for her to get fairy tale-like pictures for her portfolio.  This is also one of my favorite pics.  When we took these, it was February and freezing!


Now I have to break some news to you.  Lynsey is awfully busy raising four little chicks, so she is currently "retired".  BUT...Ryan Price took all of the pictures used in our header and sidebar.  I recommend him hands-down.  The BEST.  


I love Lynsey for so much more than just her pictures.  She's become one of my dearest friends in the last couple years. (Asher and their farm-girl "Waney Wae" are best buddies.)  What I love about Lynsey is that the longer you know her, the more you are amazed at all that she encompasses.  Not only is she the Farmer's Wife.  She is Ghetto.  The girl knows how to dance and speaks like she's from the hood.  Yet, she's Crunchy. Like Rachel, she fields all of my natural-related questions. (Her All-Purpose Spray is what I clean most all of the surfaces in my house with. LOVE it.)  The girl does her research and always knows the science behind why things work.  Master decorator.  Seriously. You walk in her house and feel like you're looking at spreads from Country Living.  Food Snob. I often reap the benefits of her being one of the best cooks that I know. And that's just the beginning...BUT..I know I've gone on and on and you're probably wondering where in the world this busy bag swap is...I just couldn't resist sharing some Lynsey Love with ya.


Family: I've been happily married to a farmer and the man of my dreams for over 10 years. I've got to give him shout outs on this busy bag project too! Thanks Jason! We have 4 girls: Kaylyn (7), Laney Rae (4), Ruthie (2), and Exie Jo (7 mo). We live on a farm in Brenham, TX.


How do you spend your free time? I think most of us mommies chuckle at this. In all reality, my free time is devoted to catch up on things I can't do when I DON'T have free time. Is that vague enough for you? Good. I love cooking and experimenting with recipes. I'm a foodie. Dork alert: I love reading natural health books and alternative methods of health treatments. I do love being crafty and creating things although I don't get to do it very often. The beauty of this has been that as my girls have gotten older, I have included them more and more into this aspect of my life. We have fun with that! I also thoroughly enjoy photography.

When you were a child, what was one of your favorite ways to spend your day? I remember playing school with my sister all of the time.

Fondest memory with your mom as a child? I loved going garage sailing with my mom on the weekends. She was always so sweet about letting me pick out some 25 cent decoration for my room. I thought I was quite the decorator. It also always seemed as though she had some fun activity for us to go and do.

What does special time with your children look like? I like to take just one or two of my girls at a time with me on special errands. I have found this to be such a fun way to spend one on one time with them. My girls LOVE to play beauty shop so we are always playing that. We also spend a lot of time in the kitchen together. My older girls are becoming fond of cooking and this makes my heart so happy! As much as I can, I try and include my girls in whatever activity that I am doing around the house.

Favorite outdoor activity with the kids: We live on a farm, so we are constantly outside doing something together. I guess one of our favorite things to do is collect eggs in the evening with daddy. We pile in the bed of the truck and go driving around the farm at sunset. This is one of my favorite times of day! Another favorite thing we do is school outside on pretty days. We lay out a quilt on the grass and have school there.

A favorite tradition that you want to pass down to your kids: Whatever the holiday may be, I feel like one area that we are firm in is opening up our home to family and friends and surrounding ourselves with lots of people on holidays. We love having people over and celebrating!

Our family picture.....this is comical. We currently do not have a family picture of ALL of us since our last baby girl was born. So, we had to make do with a snapshot of me on the couch with the girls. My hubby was behind the camera. And I may or may not have just told my 2 year old "Smile, or you'll get a spanking."

*************


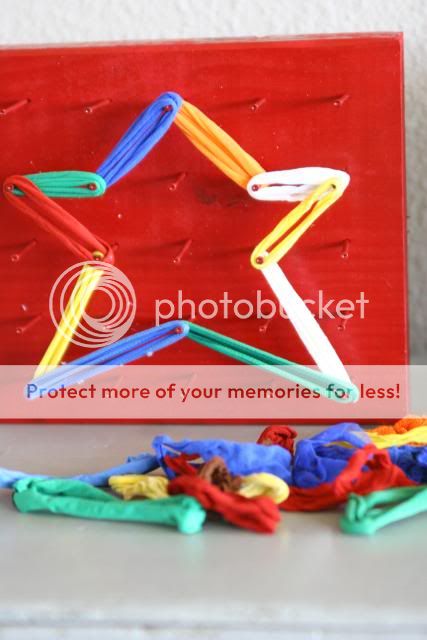
Geoboards are so versitile and can be used a number of ways in teaching a variety of concepts. My 2 year old all the way up to my 7 year old have enjoyed playing with their Geoboards. 


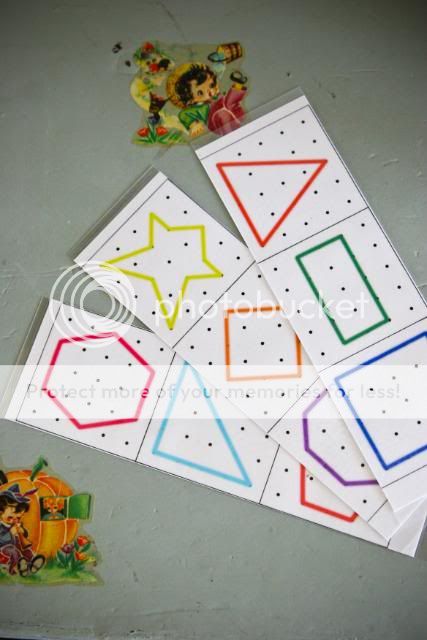
You can teach basic geometric shapes using these boards.

These are so fun for my girls to sit and do together. I also find this to be a really easy activity that doesn't require very much assistance from me. And its really sweet to see the older kids teaching the younger ones their shapes on their boards.


For the older children, you can create geometric shapes that are a bit more challenging.


 Or you can teach your child some of their numbers and letters too on the boards.


We even like to freestyle and see what shapes or patterns we can come up with on our own! The possibilities really are endless. 

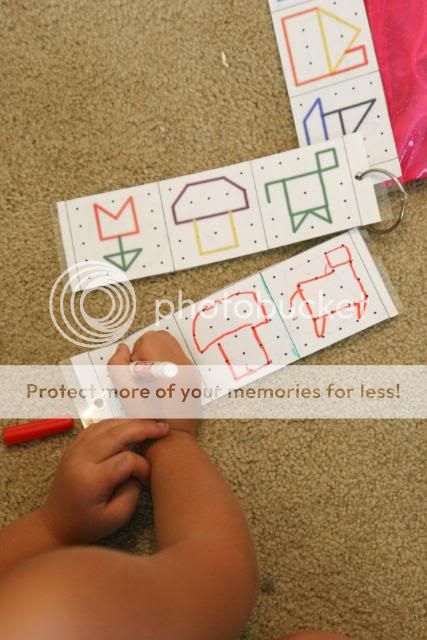
Another thing my girls have enjoyed doing with this project is drawing their shapes directly onto the grid cards as well. This would be a simple thing to throw into a diaper bag or backpack on the go.
Here is how I (mostly my husband) made them:

In all reality, if I were making just ONE geoboard, I might consider using THIS method of buying a wooden pre-cut plaque with routered edges. They are about $6 a piece at Hobby Lobby and you could probably get one for half price when they go on sale. However, they weren't on sale when we were purchasing materials for this project, and we were making a lot of them so we had to keep our cost down. I don't know if I'd use the thumbtacks, so we opted for something a little more durable and used nails instead.

Since these were mostly for small children (preschool aged), we chose to do a simple grid of nails of 5 across and 5 down. 

Breakdown of Supplies: 
1. We used a 2x8x10 board. My husband cut them down into 8"x 8" squares. We used 2 boards total to make 26 of them. 
2. We measured out a grid (this will depend on the size of board that you use) on cardboard as our template for nailing the nails into the boards. ****Honestly, this was the hardest part of the whole process was figuring out the grid and the measurements for it.
3. My husband graciously nailed in 650 nails into the boards in our grid pattern.
4. We spray painted them after the nails were in. I wanted this look over the unfinished look, but you do NOT have to spray paint them. 
5. I designed the grid cards (file below) in photoshop with various shapes. I also included a row of blank grids so that you could free-hand other geometric shapes, numbers, or letters. I used the Bakers Family blog grid template and then designed my own shapes on the cards verses leaving them blank.
 6. Printed them on cardstock at home. I then laminated the 8.5 x 11 sheets of cardstock and cut them into rows. 
7. I put these cards on a metal ring along with a pencil bag and the cloth potholder loops and hair rubberbands so it would all stay together. ** The potholder loops were a little lose for the shapes that weren't so spread apart, so I included some hair rubberbands in there as well.

Price Breakdown:
(2) 2x8x10 boards of wood: $12 ($6 each)
(1) large box of nails: $6
(4) cans of spray paint: $12 ($3 each)
(3) large bags of potholder loops from Hobby Lobby: $12 ($4 each) I put a handful of loops in each bag.
(26) metal rings from Walmart: $8 (pkgs of 8@ $1.88 each)
(26) plastic pencil bags: $6.50 (4 bags for $1 at a local dollar store)
***For printing and laminating, I used my own personal printer and my own laminator. I would estimate about $10 for me to do this. However, it will vary if you print them at a copy center or laminate them somewhere else. 

Total cost for 26 Geoboards: $56.50 OR $2.17 each.

Downloads:

**Terms of Use:
We'd love for you to feel free to use the files that the ladies in our Busy Bag Swap have worked hard to create, but please keep in mind that the printable images and files on this site are some of our ladies own exclusive designs. They have been generous enough to freely share them.

The terms of use for using the free printable crafts and activities are as follows:  You may share these printables with students, friends, neighbors and family or even with your child's class full of children. As long as you share for personal use only. Please do not post printables on a web site - instead provide a link back to the original posting on this site. Linking to the original page is both welcome and appreciated.


**********************
                                       Go check out what Busy Bag is up today on Grow!


September 5, 2011

Busy Bag Swap: Day 6 (Cupcake Decorating)


This adorable project was, again, inspired by Crystal from MoneySavingMom.  Liz and I met in college through a mutual friend. Our kids are all around the same ages, so we have kept up through each others blogs over the last couple years. Thanks for all your hard work in cutting, Liz! I know this was no small feat! And my kids have loved being "cupcake makers'" the last couple days!


Family: Emily (working towards 3 and a half), Olivia (18 months), and baby #3 will be making an appearance at the end of December

How do you spend your free time?
What free time?  Just joking.  Sorta.  I love cooking and attempting to run regularly, although there is always at least one kid on my leg when I cook or a jogging stroller in front of me, so I don't really consider this free time.  If I have a free second to myself, I am most likely perusing Pinterest for kid activities, recipes, or home decor ideas.

When you were a child, what was one of your favorite ways to spend your day? I would always play school with my baby dolls, although, I never became a teacher.  Maybe that is why I love being a parent so much... I can live out my childhood fantasies!


Fondest memory with your mom as a child? Growing up, my mother was always good about providing me a lot of opportunities for crafts, cooking, and nature activities.  I loved these things growing up and love being able to use some of the same ideas with my kids.

What does special time with your children look like? I stay home with my girls, so I feel like all day is special time.  I hope we are constantly making memories.  My favorite part of the day, though, is watching them play together.  They absolutely love each other, and they have giggles only reserved for each other.


Favorite outdoor activity with your kids? We moved back from North Carolina a year ago, and although my husband and I are from Texas, we were spoiled and now cannot stand to be outside in this Texas heat.  When it cools off, we look forward to going on family walks with the wagon, going on nature walks, and playing at the playground once again.

A favorite tradition that you want to pass down with your children? I don't know if this would exactly count as a tradition, or not, but growing up, we always had parties and large gatherings at our house.  I thought it was so great how much my mom loved entertaining.  Our house was a place where the action was and where my friends always felt welcomed.  I hope to create the same environment for our children.


Our family picture:  Wow.  This is old.  A year to be exact.  Obviously, the girls have changed quite a bit since then.  Is it sad that it takes a professional to get a family picture?  Note to self... take family picture soon!


************************

The cupcake busy bag is the perfect activity for your older toddler, or preschooler.  My 3 year old absolutely loved the cupcake activities, but because of the small cupcake topping pieces and actual skill of knowing how to put a cupcake together, I wouldn't really give the activity to my 18 month old.  Obviously, you know your children the best.  If your child isn't ready for it, yet, it will definitely be a fun activity to pull out in the future.  And who doesn't like cupcakes?


Each bag contains 4 cupcake bases, 4 cupcake liners, 4 frosting cut-outs, and a lot of different options for decorating the cupcake.  At the simplest level, kids can assemble the cupcakes and decorate them to their own fancy.


Once your child is ready for more of a challenge, you can place a felt number on a cupcake liner and have your child put the appropriate number of decorations onto the cupcake frosting.


To add another counting variation, I made cupcake recipe cards.  The kids can follow the card to put the correct number of chocolate chips (the brown triangle), cherries (pink heart), and sprinkles (blue sticks) onto the top of the assembled cupcake.


You can also use the cupcakes and toppings to do basic addition and subtraction problems.  With my oldest being 3 years old, though, we are not quite at this level yet.  

All in all, I spent around $25, which really only accounts for the felt purchases.  Now, this did not include the directions I printed out (26 sheets) or the recipe cards (26 sheets, as well).  Our printer cartridge was out, so I figured I would go to Kinkos to print everything.  HUGE mistake.  I am not even going to tell you how much it was.  It was my own stupidity and I learned my lesson.  It is ALWAYS cheaper to print off at home!!!

Materials I used...
(I want to preface this with saying that I originally had a different idea in mind when it came to the felt numbers.  Because of the first idea, I scaled down the cupcake template from Money Saving Mom to 75%.  The following yardage for the felt was based off of the scaled down template.)  
- 1 yard of light brown felt
- 3/4 yard of light blue felt
- 1/3 yard of both dark brown and ivory felt
- 4 sheets of ivory felt to make little squares for the numbers 1-10 (I went back and did this after my first purchase.  You can always just add to the ivory yardage you buy from the bolt.)
- pink material to cut out little hearts (Money Saving Mom uses more felt, but I had a pink bag ($2)  laying around in the material of a reusable grocery shopping bag.  I just used this.)
- foam for sprinkles (I also had colored foam sheets floating around the house that I used.  Again, Money Saving Mom just used more colored felt.)
- paint pen to write numbers 
- 52 sheets of card stock to print out instructions and recipe cards (Looking back now, I should have scaled the directions down so 2 copies would fit on a page.  Live and learn.)

I roughly used the template on page 3-4 [pdf cupcake template from Money Saving Mom] to trace my cupcakes.  The chocolate sprinkles are just cut out triangles of brown felt, the cherries are cut out hearts, and the sprinkles are cut out, colored rectangles.  I didn't use a template for these three things.  And make sure you print out the directions and cupcake cards.  Although very similar, I redid the original cupcake directions to add some activities.

Hope you all enjoy!

Downloads:
Cupcake Recipe Cards
MoneySavingMom's Template & Instructions
Liz's Cupcake Instruction Cards included in our Swap

**Terms of Use:
We'd love for you to feel free to use the files that the ladies in our Busy Bag Swap have worked hard to create, but please keep in mind that the printable images and files on this site are some of our ladies own exclusive designs. They have been generous enough to freely share them.

The terms of use for using the free printable crafts and activities are as follows:  You may share these printables with students, friends, neighbors and family or even with your child's class full of children. As long as you share for personal use only. Please do not post printables on a web site - instead provide a link back to the original posting on this site. Linking to the original page is both welcome and appreciated.

**********************
                                       Go check out what Busy Bag is up today on Grow!

Busy Bag Swap: Day 5 (Playdough Mats)


I learn so much from my friend, Rachel.  She is seriously a wealth of information in so many areas and probably gets irritated that I usually have a long list of questions ready to ask, whenever I see her. I used to see her every morning at 6 a.m. when we were in the same crossfit class.  I'd try to space them out..and ask them in small doses. (Go poke around on her blog. I promise you won't be disappointed.  I love her tub cleaner recipe!)  She's a doula and instructed us on the Bradley Method that we used with Oliver (remember how I promised I was going to write his birth story? Oops!) Maybe I can distract you with something EVEN MORE exciting than his birth story...ready? After a medically-eventful week, Rachel pretty much delivered her OWN baby last week in a hotel room a couple hours away from home! Go read it here!


Family: Josiah (5.5), Annalise (3), Micah (10 days old)


Blog address: www.supercinski.net

How do you spend your free time? I love to read, garden, work out, and sew in my free time. I also get to teach childbirth, help at births, and teach/help with breastfeeding on the side of being a wife and mom.

When you were a child, what was one of your favorite ways to spend your day? I remember spending my summers playing in the pool with my brothers and sister all morning, then curling up in my bean bag chair with a good book for the afternoon.

What is your fondest memory with your mom as a child? I had to go to a lot of far away doctor appointments as a young tween and teen, and my mom and I would make it a special day together with lunch and a long time in the car together to talk. I loved those simple, long days full of one-on-one time with her, since in normal day-to-day life, she was really busy working full-time and with four kids.


What does special time with your children look like? My husband and I try to spend special one-on-one time with our kids each week, though it is often doing very simple things such as working on a project together, running errands, cooking, reading and playing games. I love that special time doesn't have to be hard or complicated.


What is your favorite outdoor activity to do with your child? We spend a lot of time outdoors (when it is not 100 degrees out!), playing at the park, hiking at a park, riding bikes, or working in the garden.

My favorite blogs are: My favorite homeschooling blog currently is http://halfahundredacrewood.blogspot.com/ since she blogs a lot about supplementing Classical Conversations at home, which is the homeschool community we are a part of.

What is a tradition that you would like to hand down to your children? There are so many! I love the book, Treasuring God in Our Traditions by Noel Piper. It has really inspired me to be intentional with our special holiday traditions and more commonplace traditions. I hope to pass on traditions that clearly communicate God's love to my children and how much we love them. 


*************


Playdough mats provide your child with creative ways to use playdough, along with many learning activities to help with counting, shapes and fine motor skills.


Each bag contains a booklet of 20 different laminated playdough mats, playdough, and instructions.

The most basic way your child can play with the mats, is to give them the mats and playdough and read them the instructions on the top of the page and let them get busy.


You can also give your child additional instructions by telling them the number of objects to put on the page. On the number/shape mats, they can practice making the shapes and counting them, along with filling in the number outlines to practice early number writing. 


For children who can recognize numbers, you can use a dry-erase marker to write a number on the top of the image pages and encourage them to create that number of objects on the mat.

Another variation is to provide different colors of playdough for your child and give instructions such as, “On this mat, please give the crocodile four blue teeth,” to practice colors and numbers.


There are so many playdough mats available online for download or purchase, you can add all kinds of activities to your set of mats by opening the rings. If you don't want to laminate them, simply place them in page protectors.
For 26 playdough mat bags, I used:
  • 26 little containers (I found these 4/$1 at HEB)
  • 8 batches of homemade playdough  (probably half a bag of all-purpose flour was used)
  • 2 containers of book rings ($5.75 each at Office Max)
  • 12 pages of black and white printouts for each book ($18 of copies at Office Max)
  • 8 pages of color printouts for each book ($13+$13 shipping at bestvaluecopies.com – we don't have a color printer)
  • 1.5 packages of laminating sheets ($20 each at Sam's)
  • 13 pages of printed instructions
This breaks down to about $3.50. In hindsight, I probably should not have made quite as many pages to the booklets as the printing and laminating sheets added up, but I had a hard time even narrowing it down to just these mats.


Here's how I did it:
  1. I found several playdough mats online that I liked and downloaded the pdf files.
  2. I designed the number/shape mats myself, along with several of the other pages using clip art.
  3. I had them printed or made copies of them.
  4. Then, I laminated the pages, back to back, and hole-punched each page, connecting them with rings.
  5. Lastly, I made the playdough and divided it into the containers.

The playdough mats that I used that were already designed online include:
Faces  (I only printed two of these, you can add more to your booklet if you would like)

The first time I let my kids play with these, they kept my five and half year old busy for 20 minutes and my three year old busy for over 40 minutes. Enjoy!


**Terms of Use:
We'd love for you to feel free to use the files that the ladies in our Busy Bag Swap have worked hard to create, but please keep in mind that the printable images and files on this site are some of our ladies own exclusive designs. They have been generous enough to freely share them.

The terms of use for using the free printable crafts and activities are as follows:  You may share these printables with students, friends, neighbors and family or even with your child's class full of children. As long as you share for personal use only. Please do not post printables on a web site - instead provide a link back to the original posting on this site. Linking to the original page is both welcome and appreciated.


**********************
                                       Go check out what Busy Bag is up today on Grow!